==作者:cybsky==
[toc]
jdbc连接hive
beeline -u jdbc:hive2://192.168.6.1:10009 -n yarn
连接Phoenix
sqlline.py localhost可以进入phoenix shell 然后 !tables查看表
ls -l排序
按大小排序
[root@localhost ~]# ll -Sh

按时间排序

[root@localhost ~]# ll -rt
ll -t 是降序, ll -t | tac 是升序
查询可执行文件命令
which eclipse
想要在xstar上执行eclipse的话如果有变量直接eclipse就可以了
给SecureCRT安装上传和下载的工具
yum install lrzsz
现在CentOS7使用systemd作为新的init系统,而systemd系统使用“target”来代替“runlevel”,默认有两个主要的target:

 multi-user.target:相当于runlevel 3[命令行界面],graphical.target:相当于runlevel 5[图形界面]

设置默认的target则使用命令:
ln -sf /lib/systemd/system/<target name>.target /etc/systemd/system/default.target

我这里要将CentOS7开机默认进入命令行界面,则运行命令:
ln -sf /lib/systemd/system/multi-user.target /etc/systemd/system/default.target
centos7开机模式
现在CentOS7使用systemd作为新的init系统,而systemd系统使用“target”来代替“runlevel”,默认有两个主要的target:
multi-user.target:相当于runlevel 3[命令行界面],
graphical.target:相当于runlevel 5[图形界面]

设置默认的target则使用命令:
ln -sf /lib/systemd/system/<target name>.target
/etc/systemd/system/default.target

我这里要将CentOS7开机默认进入命令行界面,则运行命令:
ln -sf /lib/systemd/system/multi-user.target
/etc/systemd/system/default.target
切换用户
su [user] 和 su - [user]的区别:
su [user]切换到其他用户,但是不切换环境变量,su - [user]则是完整的切换到新的用户环境。

如:

[root@rac1 ~]# pwd  --当前目录
/root
[root@rac1 ~]# su oracle --使用su [user]
[oracle@rac1 root]$ pwd  --当前目录没有改变,还是之前的用户目录
/root
[oracle@rac1 root]$ su - oracle --使用su - [user]
Password:
[oracle@rac1 ~]$ pwd   --当前目录变为当前用户的家目录
/home/oracle
[oracle@rac1 ~]$
所以建议大家在切换用户时,尽量用su - [use r],否则可能会出现环境变量不对的问题。
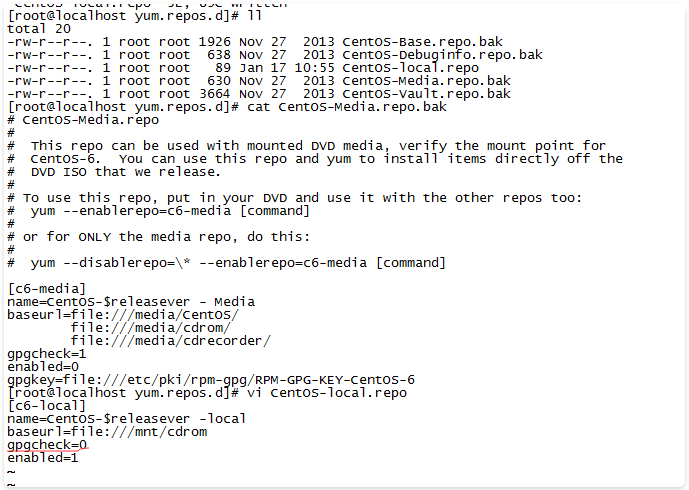
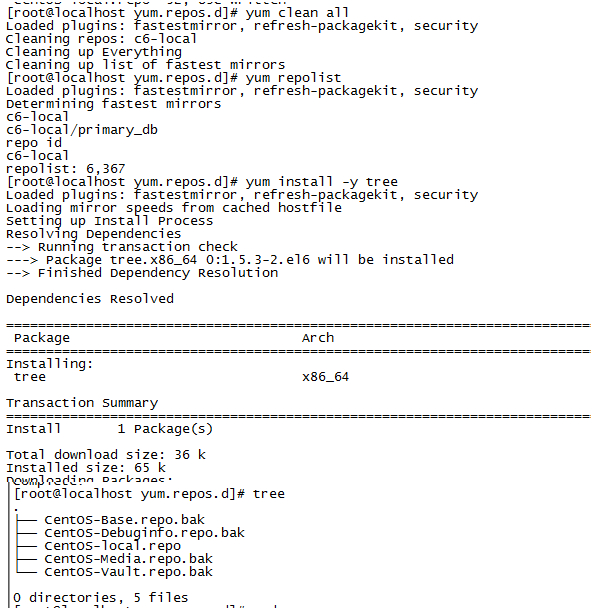
无法用yum安装
==提示:file:///mnt/cdrom/repodata/repomd.xml: [Errno 14] Could not open/read file:/ ==


rz上传不成功 *was skipped
==权限不够==

使用tar命令解压.zip文件的时候,遇到如下异常
linuxidc@Ubuntu:~/Documents$ tar -xzvf wls1033_dev.zip
gzip: stdin has more than one entry--rest ignored
tar: Child returned status 2
tar: Error is not recoverable: exiting now
==tar命令是调用了gunzip命令的,
对只有一个压缩内容的文件来解压的时候才用tar, 而如果压缩包里有多个文件被压缩了,
tar命令不能继续工作。可以采用unzip命令去解压。
先查看是否已安装unzip,没有安装的话下载unzip。
然后解压缩:==
linuxidc@ubuntu:~/Documents$ unzip wls1033_dev,zip -d weblogic
解压缩到当前文件夹下的weblogic文件夹下。

设置变量的三种方法
- 在/etc/profile文件中添加变量【对所有用户生效(永久的)】
用vi在文件/etc/profile文件中增加变量,该变量将会对Linux下所有用户有效,并且是“永久的”。
例如:编辑/etc/profile文件,添加CLASSPATH变量
vi /etc/profile
export CLASSPATH=.:$JAVA_HOME/lib/tools.jar;$JAVA_HOME/lib/dt.jar
注:修改文件后要想马上生效还要运行# source /etc/profile不然只能在下次重进此用户时生效。
- 在用户目录下的.bash_profile文件中增加变量【对单一用户生效(永久的)】
用VI在用户目录下的.bash_profile文件中增加变量,改变量仅会对当前用户有效,并且是“永久的”。
例如:编辑li用户目录(/home/li)下的.bashrc
$ vi /home/li/.bashrc
添加如下内容:
export CLASSPATH=.:$JAVA_HOME/lib/tools.jar;$JAVA_HOME/lib/dt.jar
注:修改文件后要想马上生效还要运行$ source /home/li/.bashrc不然只能在下次重进此用户时生效。
- 直接运行export命令定义变量【只对当前shell(BASH)有效(临时的)】
在shell的命令行下直接使用[export变量名=变量值]定义变量,该变量只在当前的shell(BASH)或其子shell(BASH)下是有效的,shell关闭了,变量也就失效了,再打开新shell时就没有这个变量,需要使用的话还需要重新定义。
添加用户 赋予root权
1、添加用户,首先用adduser命令添加一个普通用户,命令如下:
#adduser tommy
//添加一个名为tommy的用户
#passwd tommy   //修改密码
Changing password for user tommy.
New UNIX password:     //在这里输入新密码
Retype new UNIX password:  //再次输入新密码
passwd: all authentication tokens updated successfully.
2、赋予root权限
方法一:修改 /etc/sudoers 文件,找到下面一行,把前面的注释(#)去掉
Allows people in group wheel to run all commands
%wheel    ALL=(ALL)    ALL
然后修改用户,使其属于root组(wheel),命令如下:
#usermod -g root tommy
修改完毕,现在可以用tommy帐号登录,然后用命令 su – ,即可获得root权限进行操作。
方法二:修改 /etc/sudoers 文件,找到下面一行,在root下面添加一行,如下所示:
Allow root to run any commands anywhere
root    ALL=(ALL)     ALL
tommy   ALL=(ALL)     ALL
修改完毕,现在可以用tommy帐号登录,然后用命令 sudo – ,即可获得root权限进行操作。
方法三:修改 /etc/passwd 文件,找到如下行,把用户ID修改为 0 ,如下所示:
tommy:x:0:33:tommy:/data/webroot:/bin/bash
防火墙
linux6
重启后生效
开启: chkconfig iptables on
关闭: chkconfig iptables off即时生效,重启后失效service 方式
开启: service iptables start
关闭: service iptables stop
linux7
CentOS7这个版本的防火墙默认使用的是firewall,与之前的版本使用iptables不一样。按如下方便配置防火墙:
1 | 1、 查看防火墙状态 |
新增用户
1 | 新增用户 |
新增硬盘
1 | fdisk /dev/sdb |
关于分区
1 | [root@BDS data3]# fdisk /dev/sdb1 |
查看某一端口的占用情况: lsof -i:端口号
centos6.7设置开机启动命令界面
开机后进入图形化界面还是进入命令行取决于inittab文件中的配置。该文件位于etc目录下。
1 | #vim /etc/inittab |
保存文件后重启系统你就可以看见是启动的文本界面了。
查看系统内核版本
1 | cat /proc/version |
查看系统版本
1 | cat /etc/redhat-release |
查看sftp和ftp连接数
1 | 虽然是打印tcp,但是基本都是sftp和ftp连接 |
centos给自带的openjdk设置环境变量
1 | 查看版本 |
软链
1 | ln -sfv /path/to/source /path/to/target |
根据关键字杀死所有进程
1 | ps -ef | grep tsoc | grep -v grep | awk '{print $2}' | xargs kill -9 |
